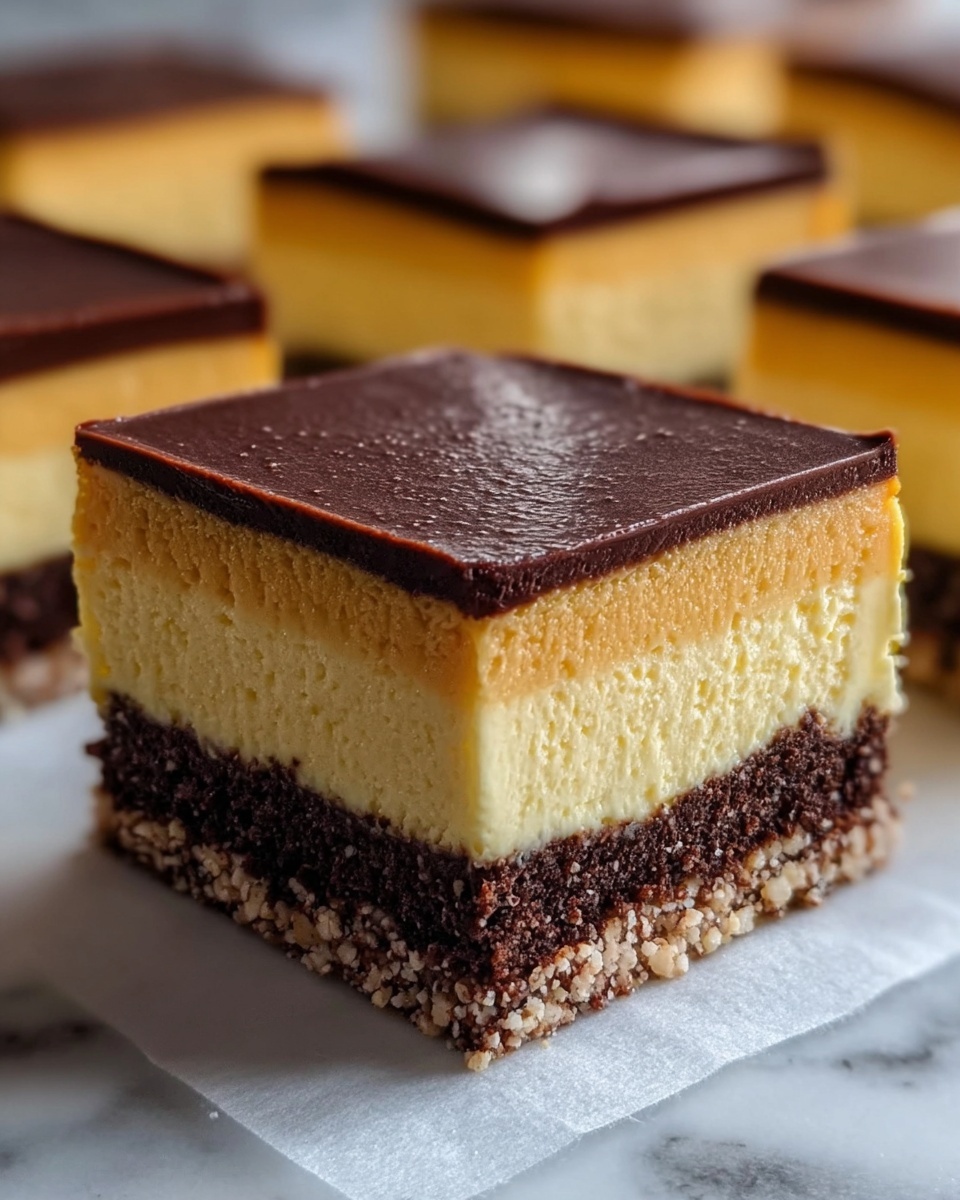
If you are craving a rich, indulgent treat that captivates with layers of texture and flavor, this Nanaimo Bars Recipe is your new best friend in the kitchen. Originating from Canada, these no-bake bars combine a crunchy base, a silky custard middle, and a smooth chocolate topping to create a harmonious bite full of nostalgia and delight. Whether you’re sharing with friends or sneaking a piece just for yourself, these bars deliver a perfect balance of sweetness and decadence that will have everyone asking for the recipe.
Ingredients You’ll Need
The beauty of this Nanaimo Bars Recipe lies in its simplicity—each ingredient plays an essential role, giving you a spectacular result with just a handful of pantry staples. From the crunch of graham crackers to the creamy custard filling, every element blends to create a memorable dessert.
- Unsalted butter (for base and custard layers): Using unsalted butter lets you control the saltiness and ensures a pure, rich flavor across layers.
- Granulated sugar: Adds needed sweetness and helps bind the base layer together with cocoa.
- Unsweetened cocoa powder: Provides a deep chocolate flavor in the base without overwhelming the other layers.
- Large egg (beaten): Acts as a binder, giving the base the perfect chewy texture.
- Graham cracker crumbs: Offers a classic crunch and crumbly texture that anchors the bars.
- Shredded sweetened coconut: Adds a chewy sweetness and tropical flair to the base.
- Chopped walnuts or almonds (optional): Introduces an extra nutty crunch for added texture contrast.
- Vanilla custard powder or instant vanilla pudding mix: The secret to that luscious custard layer, infusing creamy vanilla richness.
- Powdered sugar: Sweetens and smooths the custard to the perfect melt-in-your-mouth finish.
- Milk: Lightens the custard and makes it spreadable.
- Semi-sweet chocolate: The crowning glory—enveloping the bars in a silky, bittersweet coat.
How to Make Nanaimo Bars Recipe
Step 1: Prepare the Base Layer
Begin by lining an 8×8-inch baking pan with parchment paper, leaving extra on the sides for easy lifting later. Mix together melted butter, sugar, and cocoa powder to form a luscious chocolate base. Stir in the beaten egg until combined, then fold in the graham cracker crumbs, shredded coconut, and nuts if you’re using them. Press this mixture firmly and evenly into the pan—the sturdier the base, the better your bars will hold together! Pop it in the fridge to chill while you prepare the next layer.
Step 2: Create the Custard Middle
Next, beat softened butter with vanilla custard powder, powdered sugar, and milk until it turns light and fluffy—this custard filling is what makes these bars so unmistakably delicious. Spread the creamy custard evenly over the chilled base layer. Return the pan to the refrigerator, letting the custard firm up for about 15 to 20 minutes. This step sets the stage beautifully for the final indulgent topping.
Step 3: Add the Chocolate Topping
For the grand finale, melt semi-sweet chocolate with butter either over a double boiler or in short bursts in the microwave. Stir until smooth and glossy. Allow the chocolate to cool slightly so it thickens just enough to spread without dripping, then pour it atop the custard layer. Spread gently and evenly with a spatula. Refrigerate for at least one to two hours until the chocolate is fully set, locking in all those magnificent layers.
Step 4: Slice and Serve
Once the bars are firm, use the overhanging parchment paper to lift them out of the pan. For perfectly neat slices, warm your knife under hot water, wipe it dry, and cut carefully. These bars are ready to be enjoyed—get ready for compliments!
How to Serve Nanaimo Bars Recipe

Garnishes
While these bars are stunning on their own, adding a sprinkle of toasted coconut flakes or a few chopped nuts on top of the chocolate layer just before it sets can elevate the look and add a delightful crunch. For a festive touch, dust lightly with cocoa powder or drizzle with a bit of white chocolate.
Side Dishes
Pair your Nanaimo Bars with a scoop of vanilla ice cream for an extra creamy treat or alongside fresh berries to cut through the sweetness with a burst of freshness. A cup of freshly brewed coffee or tea also complements these bars wonderfully, balancing richness with warmth.
Creative Ways to Present
Why not serve these bars on a vibrant dessert platter layered with edible flowers or mint leaves for an elegant presentation? You can also cut them into bite-sized squares and serve as petits fours at a party, making them easy for guests to grab and enjoy without utensils.
Make Ahead and Storage
Storing Leftovers
Nanaimo Bars keep beautifully in the refrigerator for up to one week if stored in an airtight container. The layers stay moist and intact, so you can savor this treat whenever the craving hits without any loss of quality.
Freezing
For longer storage, wrap individual bars in plastic wrap and place them in a sealed freezer bag or container. They freeze well for up to three months. When you’re ready to indulge, thaw in the fridge overnight for best texture and flavor retention.
Reheating
Since Nanaimo Bars are best enjoyed cold to maintain their layered texture, reheating is not recommended. However, letting them sit at room temperature for about 15 minutes before serving can soften the chocolate slightly and enhance the flavor experience.
FAQs
Can I use walnuts instead of almonds?
Absolutely! Both walnuts and almonds add a lovely crunch and nutty flavor to the base. Feel free to choose whichever nut you prefer or leave them out entirely to suit your taste.
Is it necessary to use custard powder?
While vanilla custard powder delivers that classic creamy texture and flavor, instant vanilla pudding mix works beautifully as a substitute. The key is having a powdered mix that thickens and flavors the custard layer properly.
Can I make these bars gluten-free?
Yes! Swap the graham cracker crumbs for a gluten-free alternative, and double-check that your custard powder and other ingredients are gluten-free. This way, everyone can enjoy these lovely bars without worry.
Why does the chocolate topping sometimes crack?
Chocolate can crack if cooled too quickly or if the layer is too thick. To prevent cracking, allow the chocolate to cool slightly before pouring and set it in the fridge at a moderate temperature. Spreading the topping evenly also helps maintain a smooth surface.
How do I achieve clean slices?
Warming your knife under hot water and wiping it dry between cuts is a simple trick to get clean, neat slices without smudging the chocolate or crumbling the layers.
Final Thoughts
I genuinely hope you enjoy making and sharing this Nanaimo Bars Recipe as much as I do. It’s a fantastic sweet treat that feels special without requiring hours in the kitchen. Perfect for celebrations or whenever you need a luxurious pick-me-up, these bars are sure to become a treasured favorite on your dessert menu. Give it a try—your taste buds will thank you!