If you’ve ever wandered through a Japanese festival, the irresistible aroma of sweet soy glaze wafting over freshly grilled rice balls is probably etched in your memory. Today, we’re unlocking the secrets of Mitarashi Dango! These chewy mochi skewers, slicked with a glossy, savory-sweet soy sauce, are pure comfort in every bite. With just a handful of pantry staples, you can re-create this beloved treat at home and wow your friends or simply treat yourself to an authentic Japanese snack moment.
Ingredients You’ll Need
-
For the Dango:
- 1 cup (120g) glutinous rice flour (mochiko)
- 1/2 cup warm water
For the Sauce:
- 2 tablespoons soy sauce
- 2 tablespoons sugar
- 1 tablespoon mirin
- 1/2 tablespoon cornstarch
- 1/4 cup water
- Bamboo skewers
How to Make Mitarashi Dango
Step 1: Make and Shape the Dough
Begin by combining your glutinous rice flour with warm water in a medium mixing bowl. Pour the water in gradually while mixing, and start kneading by hand as it transforms into a soft, supple dough. This process is a little therapeutic, so let yourself enjoy the sensation. Once your dough is smooth and pliable, divide it into 12 equal pieces and roll each into a ball; aim for grape-sized spheres for the most authentic look and texture!
Step 2: Cook the Dango
Bring a pot of water to a rolling boil. Gently drop the dango balls in — they’ll sink at first, but you’ll know they’re perfectly cooked when they bob up to the surface. Leave them to boil for another 1 to 2 minutes to ensure that lovely, chewy interior. Use a slotted spoon to transfer them immediately to a bowl of cold water. This shocks them, locking in that pillowy texture and preventing overcooking. Drain well so they’re not soggy for the next step.
Step 3: Skewer and Prepare for Grilling
Carefully thread three dango onto each bamboo skewer. This is where the fun presentation comes in, and kids love helping out! Pat the dango dry so they’re ready to get that classic grilled finish. If you have a grill, go for it — otherwise, a nonstick skillet or grill pan does the trick.
Step 4: Make the Glorious Mitarashi Dango Sauce
In a small saucepan, stir together soy sauce, sugar, mirin, cornstarch, and a quarter cup of water. Place over medium heat and whisk constantly. As it heats up, it’ll gradually thicken and become glossy, with that beautiful sweet-salty aroma floating through your kitchen. Once it’s syrupy and shiny, take it off the heat — your glaze is ready to work its magic.
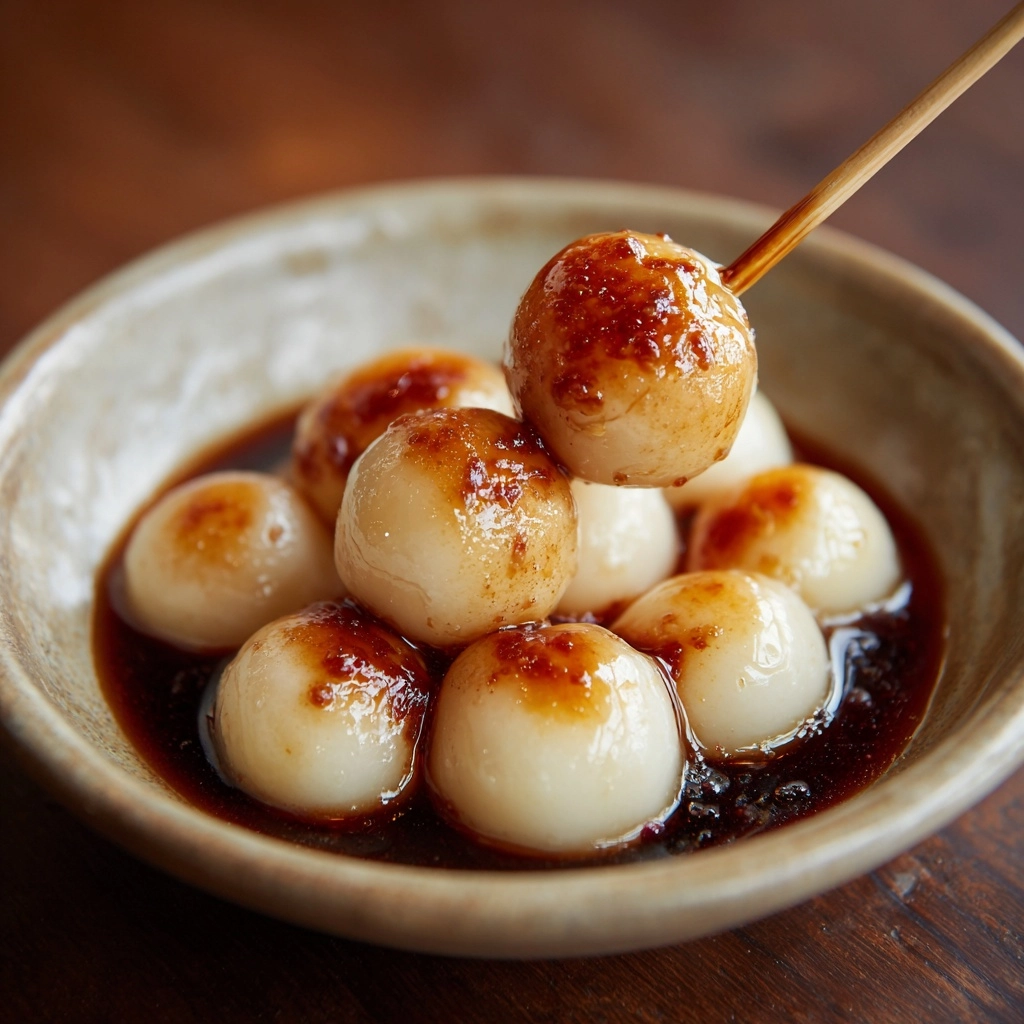
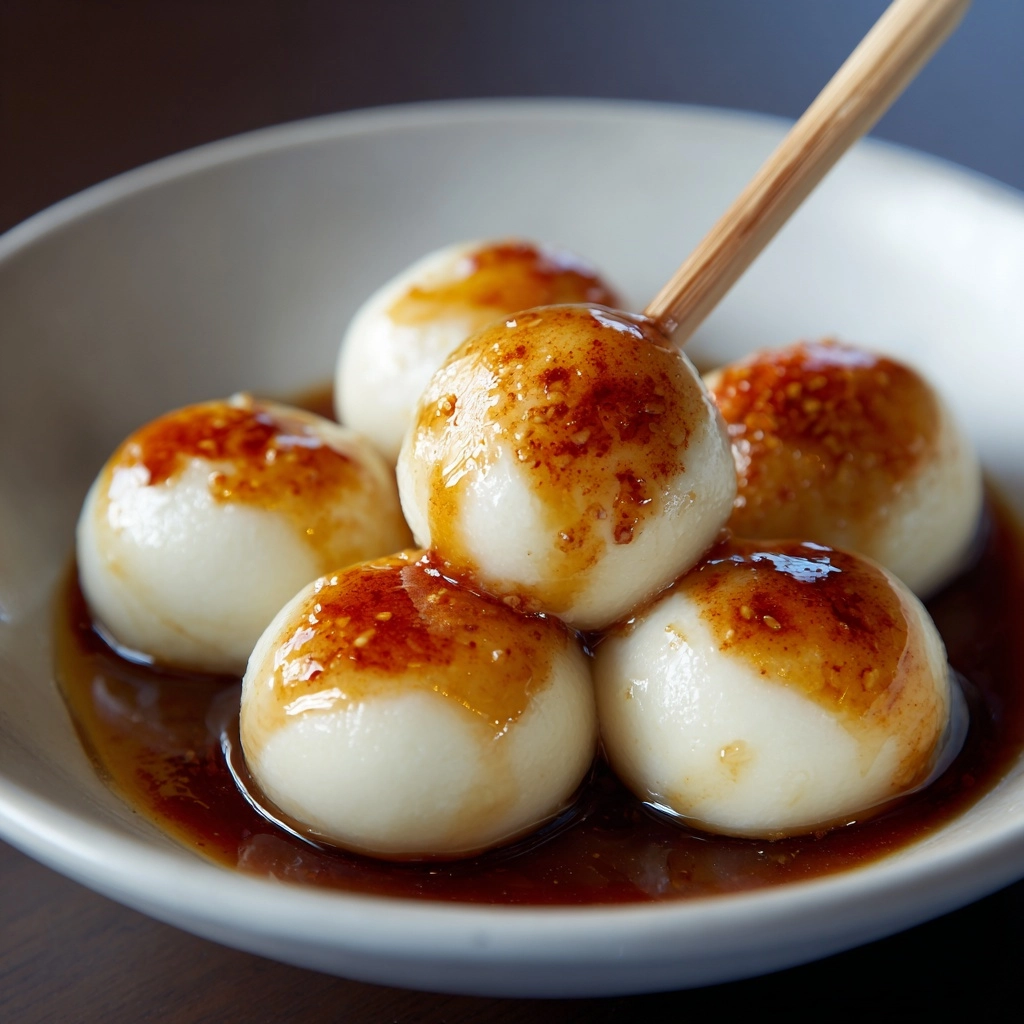
Step 5: Grill and Glaze
Lightly grill or pan-fry the dango skewers on both sides until you see golden, slightly crispy patches (bonus points for a gentle char!). As soon as they’re off the heat, brush them generously with the warm Mitarashi Dango sauce. The result? A glossy, sticky, irresistible treat that’s just begging to be devoured. Serve while still warm for ultimate coziness.
How to Serve Mitarashi Dango
Garnishes
While classic Mitarashi Dango keeps things simple, you can elevate the look and flavor with tiny sesame seeds, a dusting of kinako (roasted soybean flour), or a little sprinkle of flaky salt for dramatic contrast. The glaze should always be the star, but these little touches add interest visually and taste-wise.
Side Dishes
To round out your Japanese snack experience, serve Mitarashi Dango alongside hot green tea or a refreshing iced matcha. For a mini dessert platter, pair the skewers with seasonal fruit or other wagashi such as yokan. The sweet-salty balance of dango also plays beautifully with spicy pickles or crisp rice crackers.
Creative Ways to Present
If you’re serving guests, consider arranging dango skewers on a slate board or rustic platter with decorative parchment. For a playful touch, alternate classic dango with matcha- or black sesame-tinted varieties on the same skewer. At parties or potlucks, set up a DIY dango-glazing station so everyone can brush on as much sauce as they please — it’s interactive and fun!
Make Ahead and Storage
Storing Leftovers
Mitarashi Dango are best enjoyed fresh, warm, and glossy, but if you have leftovers, put them in an airtight container and refrigerate. The dango will firm up as they chill but will still be tasty the next day, especially if you plan to reheat them.
Freezing
You can freeze the unglazed, cooked dango balls for up to a month. To keep them from sticking together, lay them out on a baking sheet until solid, then transfer to a freezer-safe bag. Thaw in the fridge before reheating and glazing for best results.
Reheating
For the freshest taste, lightly steam or microwave the dango (covered with a damp paper towel), then briefly grill or pan-sear before brushing them with fresh sauce. This brings back their soft, bouncy texture and makes them feel almost newly made.
FAQs
Can I make Mitarashi Dango with regular rice flour?
For authentic texture, stick with glutinous rice flour (mochiko). Regular rice flour won’t give you that satisfying chew that makes Mitarashi Dango so addictive.
Is Mitarashi Dango gluten-free?
Yes! As long as you use gluten-free soy sauce, the entire recipe is naturally gluten-free and vegan-friendly, making it a fantastic option for folks with dietary needs.
Can I make the sauce less sweet?
Absolutely. Feel free to adjust the sugar or even the soy sauce slightly to suit your taste. Some families love a sweeter glaze, while others prefer a more pronounced savory kick.
Can I use a different glaze or filling?
While Mitarashi Dango is famed for its sweet soy glaze, you can experiment with toppings like anko (sweet red bean paste), black sesame, or matcha powder for variety. The dough is a fantastic base for creativity!
How do I get that signature grilled flavor at home?
If a charcoal grill isn’t handy, a kitchen torch, grill pan, or even a high-heat oven broiler will do the trick. Lightly charring the dango brings a new layer of flavor that’s so worth it!
Final Thoughts
If you’re craving that nostalgic taste of Japanese street food, give Mitarashi Dango a try in your own kitchen — they’re simple, fun, and rewarding to make. Whether you’re enjoying them solo or sharing with loved ones, each glaze-drizzled skewer promises a little moment of happiness. Let yourself savor every bite!