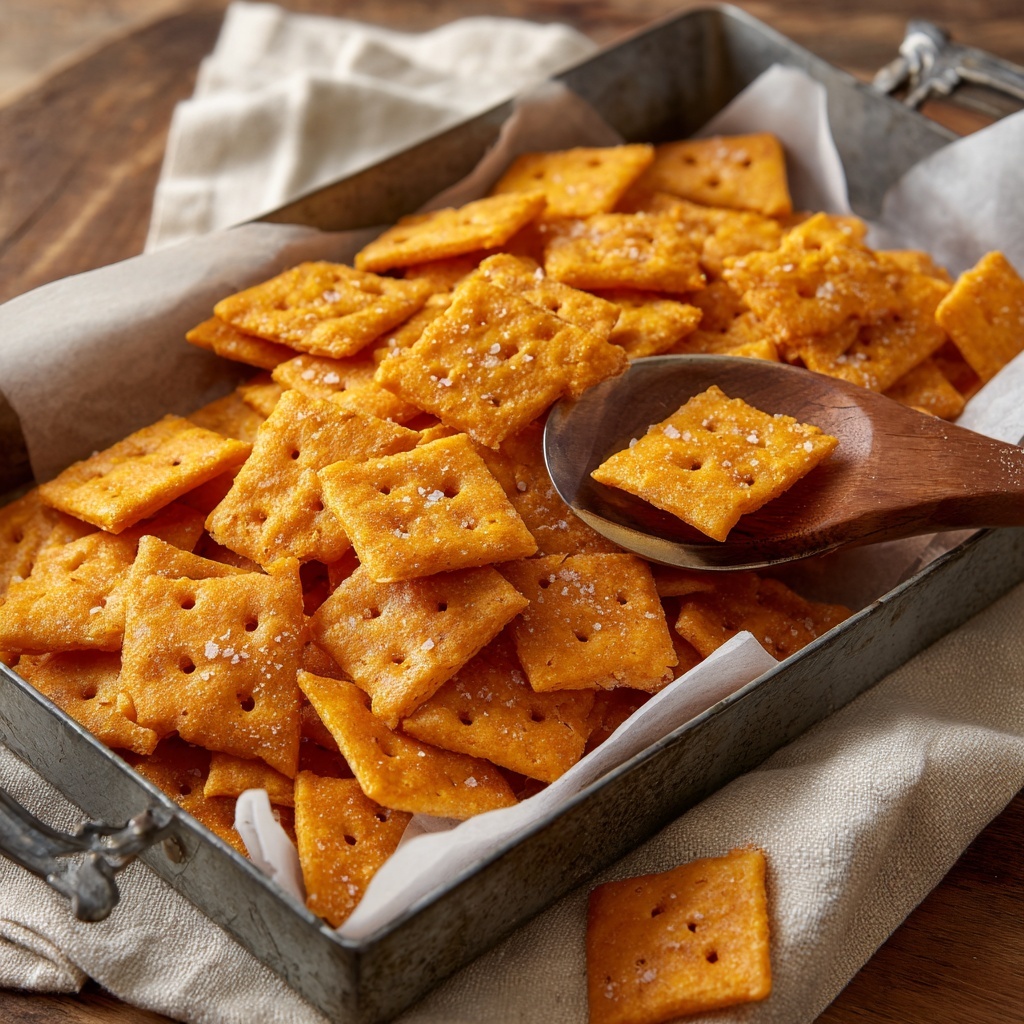
If you’ve ever wondered how to capture that perfect balance of sharp, cheesy flavor and crisp crunch right in your own kitchen, this Homemade Cheez-Its Recipe is exactly what you need. With just a handful of pantry staples and a little bit of love, you’ll create snackable, golden crackers that beat store-bought versions every time. These bite-sized delights are packed with the rich tang of sharp cheddar, and that nostalgic Cheez-It look and taste that always brings a smile.

Ingredients You’ll Need
Keeping things simple is the key to why this Homemade Cheez-Its Recipe shines so brightly. Each ingredient plays a crucial role, ensuring you get a satisfying crunch, bold flavor, and just the right saltiness without any fuss.
- 8 ounces sharp cheddar cheese: Provides the star cheesy flavor that’s both tangy and rich.
- 4 tablespoons unsalted butter: Adds moisture and a tender texture to the crackers.
- 1/2 teaspoon salt: Enhances the overall taste and balances the cheese’s sharpness.
- 1 cup all-purpose flour: The base that holds everything together for crisp, golden crackers.
- 2 tablespoons cold water: Helps bind the dough without making it sticky.
- 1/4 teaspoon garlic powder (optional): Adds a subtle savory depth to the flavor profile.
- Coarse salt for sprinkling: Creates that perfect finishing touch with bursts of saltiness on top.
How to Make Homemade Cheez-Its Recipe
Step 1: Combine the Cheesy Mixture
Start by pulsing the shredded sharp cheddar cheese, softened unsalted butter, salt, and optional garlic powder in a food processor. This blends those bold, flavorful elements seamlessly, making sure every cracker bursts with cheesy goodness.
Step 2: Add the Flour and Form the Dough
Next, add the all-purpose flour and pulse until you see coarse crumbs forming. Slowly drizzle in the cold water, one tablespoon at a time, just until your dough holds together. This careful addition keeps the dough tender without overworking it.
Step 3: Chill the Dough
Divide your dough into two discs, wrap them tightly in plastic wrap, and refrigerate for at least 30 minutes. This chilling step is essential for ensuring your crackers have that perfectly crisp snap after baking.
Step 4: Roll, Cut, and Shape
Once chilled, roll out one disc on a lightly floured surface until it’s about 1/8 inch thick. Use a pizza cutter or sharp knife to slice into neat 1-inch squares. For that iconic Cheez-It look, poke a small hole in the center of each square with a toothpick or skewer. Place your squares evenly on parchment-lined baking sheets and sprinkle lightly with coarse salt.
Step 5: Bake to Perfection
Bake your crackers at 350°F (175°C) for 14 to 16 minutes, watching for golden edges and a crisp texture. Once out of the oven, allow them to cool completely so they firm up nicely before enjoying your fresh, crunchy, homemade snack.
How to Serve Homemade Cheez-Its Recipe

Garnishes
Sprinkle your Homemade Cheez-Its with a dash of smoked paprika or tuck in a few dried herbs like rosemary or thyme to elevate flavor and add a touch of flair wherever you serve them.
Side Dishes
Pair these addictive crackers with rich dips like creamy spinach artichoke, zesty guacamole, or a smooth pimento cheese spread. They’re the perfect crunchy companion that complements both fresh veggies and hearty soups.
Creative Ways to Present
Try assembling a snack platter featuring your Homemade Cheez-Its alongside cured meats, olives, and mixed nuts. Layer them in small bowls or scatter them artistically on a wooden board to impress guests with minimal effort.
Make Ahead and Storage
Storing Leftovers
Your Homemade Cheez-Its stay crisp and tasty for up to a week when kept in an airtight container at room temperature. Avoid storing them in a humid area to maintain that satisfying crunch.
Freezing
To keep these cheesy crackers fresh for longer, you can freeze them. Just place baked and cooled crackers in a freezer-safe bag or container, and they’ll hold up perfectly for up to 3 months.
Reheating
If you want to refresh the crunch of thawed crackers, spread them on a baking sheet and warm at 300°F (150°C) for 5 to 7 minutes. This lightly toasts them back to their original crispiness without drying out the cheese flavor.
FAQs
Can I use pre-shredded cheese for this recipe?
Yes, but it’s best if the cheese is finely shredded to blend well. Freshly shredded block cheese tends to melt better and gives a richer flavor, which makes a noticeable difference in your Homemade Cheez-Its Recipe.
What can I add to make my Cheez-Its spicy?
Adding a pinch of cayenne pepper or smoked paprika into the dough mix lends a wonderful kick that transforms the classic into a spicy treat, perfect for those who love some heat.
How thin should I roll the dough?
A thickness of about 1/8 inch is ideal. Rolled too thick, the crackers won’t crisp properly; too thin, and they can become fragile or burn quickly. This ensures a perfect balance of crunch and sturdiness.
Can I make these crackers gluten-free?
You can experiment by substituting the all-purpose flour with a gluten-free blend, but results may vary. For best texture and flavor, sticking with all-purpose flour keeps your Homemade Cheez-Its Recipe classic and irresistible.
Do I have to poke holes in the crackers?
While not strictly necessary, the little holes mimic the traditional Cheez-It style and help the crackers bake evenly with that delightful bite-size shape everyone loves.
Final Thoughts
There’s something so satisfying about making your own snacks from scratch, and this Homemade Cheez-Its Recipe proves it’s easier than you think. The combination of sharp cheddar, buttery dough, and crisp baking comes together beautifully to create crackers that vanish fast. So grab your ingredients, get your hands a little cheesy, and treat yourself to this warm, crunchy delight — I promise it’ll become a new favorite in your snack rotation!
Print
Homemade Cheez-Its Recipe
- Prep Time: 20 minutes
- Cook Time: 15 minutes
- Total Time: 1 hour 5 minutes
- Yield: 6 servings (about 60 crackers)
- Category: Snack
- Method: Baking
- Cuisine: American
- Diet: Vegetarian
Description
These Homemade Cheez-Its are a deliciously crispy and cheesy snack made from sharp cheddar cheese and a few simple ingredients. Perfectly baked to golden perfection, they mimic the classic Cheez-It crackers with a savory, buttery flavor and a satisfying crunch. Ideal for snacking or serving at parties, these crackers are easy to make at home and can be customized with a hint of garlic or spices for extra zest.
Ingredients
Cheese Dough
- 8 ounces sharp cheddar cheese, shredded
- 4 tablespoons unsalted butter, softened
- 1/2 teaspoon salt
- 1 cup all-purpose flour
- 2 tablespoons cold water
- 1/4 teaspoon garlic powder (optional)
Topping
- Coarse salt for sprinkling
Instructions
- Make the Dough: In a food processor, pulse the shredded sharp cheddar cheese, softened butter, salt, and garlic powder (if using) until combined thoroughly. Add the all-purpose flour and pulse until the mixture forms coarse crumbs. Gradually add cold water, one tablespoon at a time, pulsing just until a dough forms.
- Chill the Dough: Divide the dough into two discs, wrap each tightly in plastic wrap, and refrigerate for at least 30 minutes to firm up the dough for easier rolling.
- Preheat Oven: Preheat your oven to 350°F (175°C). Prepare two baking sheets by lining them with parchment paper to prevent sticking and for easy cleanup.
- Roll and Cut: On a lightly floured surface, roll out one disc of dough to about 1/8 inch thickness. Using a pizza cutter or sharp knife, cut the dough into 1-inch squares. Then, use a skewer or toothpick to poke a small hole in the center of each square to emulate the classic Cheez-It look.
- Prepare for Baking: Transfer the cut squares to the prepared baking sheets, spacing them slightly apart. Lightly sprinkle the tops with coarse salt for added flavor and texture.
- Bake: Bake in the preheated oven for 14 to 16 minutes or until the edges of the crackers are golden brown and they are crisp to the touch.
- Cool and Store: Remove from the oven and allow the crackers to cool completely on the baking sheets. Store cooled crackers in an airtight container at room temperature to maintain their crispness.
Notes
- For a spicier kick, add a pinch of cayenne pepper or smoked paprika to the dough before processing.
- Use block cheese shredded at home for best melting and blending results; pre-shredded cheese must be finely shredded to work well.
- Ensure the dough is well chilled before rolling to prevent sticking and cracking when cutting.
- Store the crackers in an airtight container to keep them crisp for up to one week.


