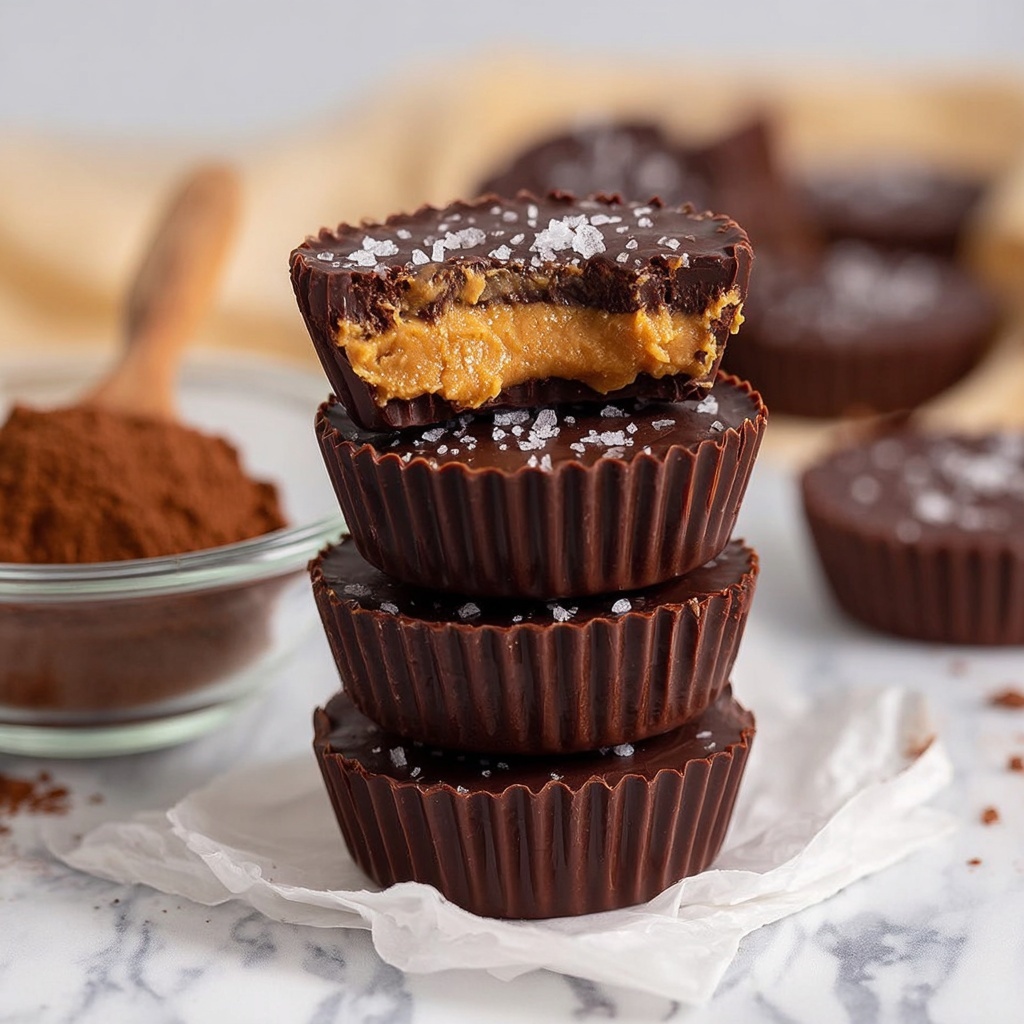
If you’re craving a guilt-free treat that perfectly balances rich chocolate and creamy peanut butter, you have to try this Healthy Peanut Butter Cups Recipe. It takes the nostalgic charm of classic peanut butter cups and transforms it into a wholesome delight using natural ingredients. Expect velvety cocoa, smooth peanut butter, and just the right touch of sweetness from maple syrup, all wrapped in a luscious, melt-in-your-mouth bite that you can feel good about enjoying anytime.
Ingredients You’ll Need
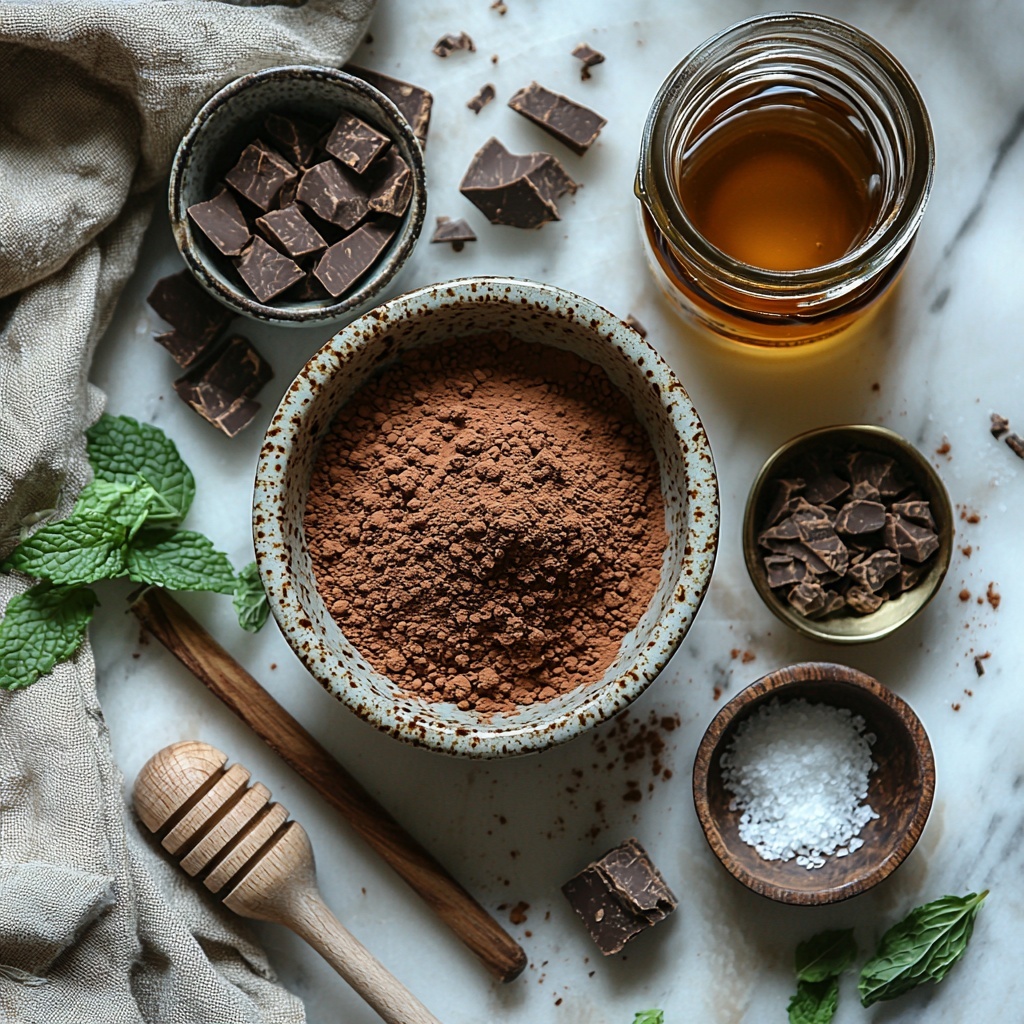
These ingredients are wonderfully simple yet essential—they each bring a unique flavor and texture that make this Healthy Peanut Butter Cups Recipe truly irresistible. From the natural sweetness of maple syrup to the smoothness of peanut butter and the richness of cocoa, every element plays a starring role.
- Cocoa powder: Choose regular or dark for that deep, chocolatey flavor essential to rich peanut butter cups.
- Coconut oil (melted): Adds smoothness and helps the cups set with a perfect snap.
- Pure maple syrup: A natural sweetener that blends perfectly to keep things moist and flavorful.
- Salt: Just a pinch balances sweetness and enhances the chocolate’s depth.
- Peanut butter (smooth): The creamy heart of this recipe, creating a luscious contrast with the chocolate layers.
How to Make Healthy Peanut Butter Cups Recipe
Step 1: Prepare the Chocolate Mixture
Start by combining the cocoa powder, melted coconut oil, ½ cup of maple syrup, and salt in a medium bowl. Whisk everything together until you get a glossy, smooth chocolate mixture. This base is key—it’s not only rich but also naturally sweetened and dairy-free, making your peanut butter cups healthier without sacrificing any of that classic chocolate taste.
Step 2: Mix the Peanut Butter Layer
In a separate bowl, whisk together the smooth peanut butter and the remaining 3 tablespoons of maple syrup. This keeps the peanut butter naturally sweet and soft, making it easy to layer inside your cups. The maple syrup also adds a subtle depth that complements the cocoa beautifully.
Step 3: Assemble the Cups
Line a 12-cup muffin tray with cupcake liners for easy removal and a neat finish. Start by spooning 2 teaspoons of the chocolate mixture into each liner, smoothing it out into a flat base layer. Then add 2 teaspoons of the peanut butter mixture right in the center, gently pressing it down to create that iconic peanut butter cup look. Finish by topping each cup with 2 teaspoons of chocolate mixture, smoothing it carefully over the peanut butter. This layering technique is what makes every bite perfectly balanced and delicious.
Step 4: Chill Until Set
Place the tray in the refrigerator for at least two hours or, even better, overnight. This waiting period is crucial as the coconut oil hardens the chocolate layers, giving you that satisfying texture you want in peanut butter cups. For a little finishing touch, sprinkle with coarse sea salt just before serving—you’ll be amazed how this tiny addition makes the flavors pop.
How to Serve Healthy Peanut Butter Cups Recipe
Garnishes
While these peanut butter cups are fantastic on their own, a light sprinkle of coarse sea salt or a few chopped roasted peanuts on top adds a lovely crunch and bursts of flavor. You can also dust a little extra cocoa powder for an elegant finish that elevates the presentation and taste.
Side Dishes
Serve your healthy peanut butter cups alongside a refreshing fruit salad or a chilled glass of almond milk for a balanced snack or dessert. The fresh fruit’s natural acidity perfectly cuts through the richness, making every bite even more enjoyable.
Creative Ways to Present
Try placing your peanut butter cups on a decorative platter lined with parchment paper or serve them in mini cupcake wrappers with colorful liners to brighten up any gathering. You can also stack them with wax paper between layers for gifting—it’s a sweet treat that’s sure to impress family and friends.
Make Ahead and Storage
Storing Leftovers
Keep your Healthy Peanut Butter Cups Recipe fresh by storing leftovers in an airtight container in the refrigerator. They will stay perfectly firm and delicious for up to one week, so you can enjoy these treats at any moment without losing their charm.
Freezing
If you want to make a batch ahead of time, freezing is an excellent option. Wrap each cup in parchment or plastic wrap and place them in a freezer-safe container. They will keep for up to three months and thaw quickly in the fridge when you’re ready for a sweet pick-me-up.
Reheating
These treats are best enjoyed cold, but if you prefer them slightly softened, let them sit at room temperature for 5 to 10 minutes before eating. Avoid microwaving as it can cause the coconut oil to separate and lose that perfect texture.
FAQs
Can I use crunchy peanut butter in this recipe?
Absolutely! Crunchy peanut butter will add a delightful texture contrast, but be sure to mix it well with the maple syrup to keep it spreadable for layering.
Is it possible to substitute the maple syrup?
Yes, honey or agave nectar can be used if you prefer, though maple syrup offers the best balance of sweetness and flavor in this recipe.
Can I make these nut-free?
You can swap peanut butter for sunflower seed butter or another seed butter for a nut-free option; just expect a slightly different flavor profile but a delicious result nonetheless.
Why use coconut oil instead of butter?
Coconut oil helps these cups set up nicely at room temperature and keeps the recipe dairy-free, making it suitable for those with lactose intolerance or vegan preferences.
How long do these peanut butter cups last?
Stored in the fridge, your Healthy Peanut Butter Cups Recipe will last about a week, but they’re so good, you might find they disappear well before then!
Final Thoughts
I can’t recommend this Healthy Peanut Butter Cups Recipe enough if you want a treat that feels indulgent but keeps things wholesome. It’s one of those rare desserts that satisfy your sweet tooth while still feeling like a smarter choice. So, gather your ingredients, get mixing, and enjoy every delicious bite of these homemade delights—you’re going to love sharing them as much as eating them!
Print
Healthy Peanut Butter Cups Recipe
- Prep Time: 15 minutes
- Cook Time: 0 minutes
- Total Time: 2 hours 15 minutes
- Yield: 12 servings
- Category: Dessert
- Method: No-Cook
- Cuisine: American
- Diet: Vegetarian
Description
These Healthy Peanut Butter Cups are a delightful homemade treat made with natural ingredients like cocoa powder, coconut oil, pure maple syrup, and smooth peanut butter. Perfectly layered and chilled to set, they offer a rich chocolate and peanut butter flavor without the refined sugars or additives found in store-bought versions. Ideal as a guilt-free snack or dessert, these cups are simple to prepare and naturally sweetened.
Ingredients
Chocolate Layer
- 1 cup cocoa powder (regular or dark)
- ½ cup coconut oil (melted)
- ½ cup pure maple syrup (room temperature)
- ½ tsp salt
Peanut Butter Layer
- ⅓ cup smooth peanut butter
- 3 Tbsp pure maple syrup (room temperature)
Instructions
- Prepare the Chocolate Mixture: In a medium-sized bowl, combine the cocoa powder, melted coconut oil, ½ cup of the pure maple syrup, and salt. Whisk thoroughly until the mixture is smooth and well blended with no lumps.
- Make the Peanut Butter Mixture: In a separate medium bowl, whisk together the smooth peanut butter and the remaining 3 tablespoons of maple syrup until creamy and fully combined.
- Layer the Cups: Line a 12-cup muffin tray with cupcake liners. Spoon 2 teaspoons of the chocolate mixture into the bottom of each liner and smooth it out into an even layer. Then add 2 teaspoons of the peanut butter mixture gently in the center of each chocolate layer, pressing down slightly. Top each cup with 2 teaspoons more of the chocolate mixture, smoothing over the peanut butter layer with the back of a small spoon until flat and even.
- Chill and Set: Place the tray in the refrigerator for at least two hours or overnight to allow the peanut butter cups to harden fully. Once set, optionally sprinkle with coarse sea salt for an added flavor contrast. Keep the cups refrigerated between servings to maintain firmness.
Notes
- Use cupcake liners to prevent sticking and make removal easy.
- Maple syrup can be replaced with honey if desired, but it will alter the flavor slightly.
- For a nuttier texture, crunchy peanut butter can be used instead of smooth.
- Store peanut butter cups in the fridge for up to one week for best freshness.
- These cups are naturally gluten free and vegetarian.
