
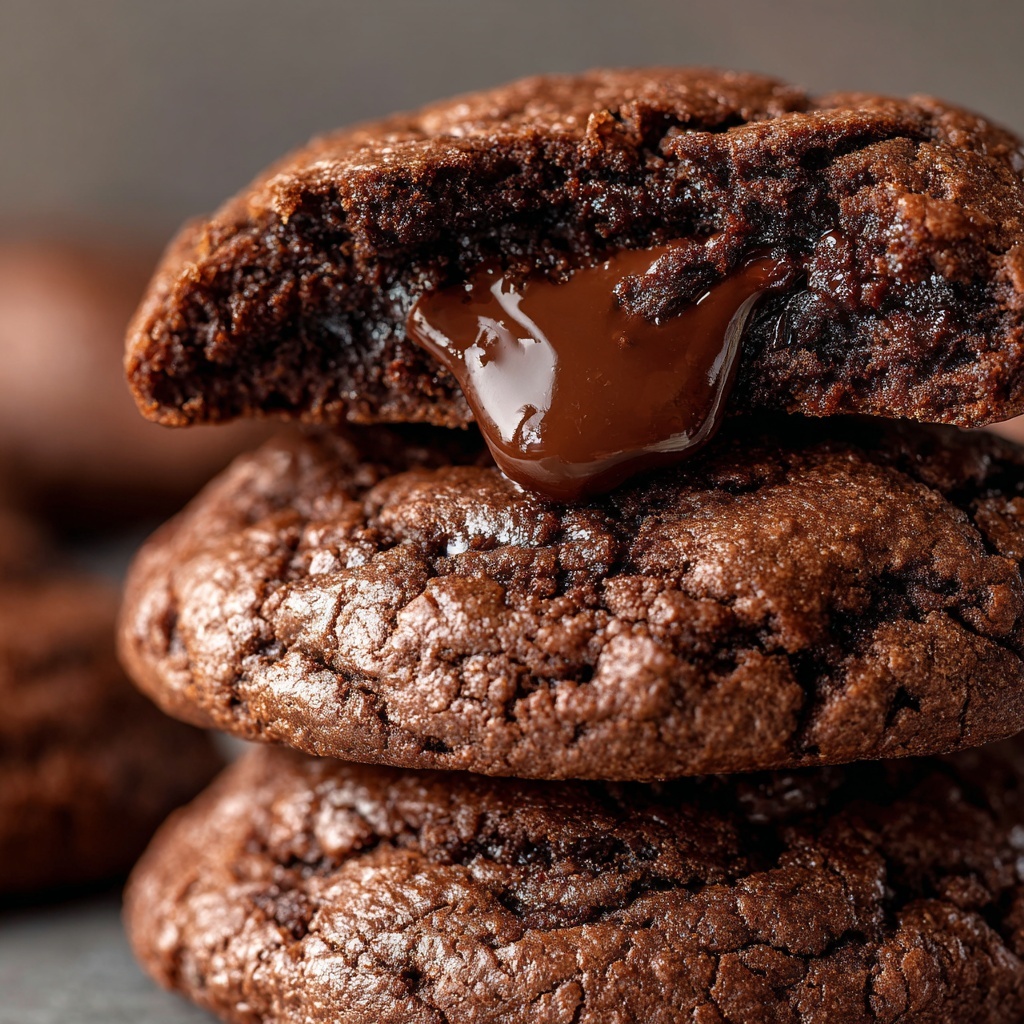
If you’re craving something irresistibly rich and chocolatey, this Chocolate Lava Brownie Cookies Recipe is exactly what you need. Imagine the perfect marriage of a fudgy brownie and a warm, molten chocolate center all wrapped in a cookie. With gooey chocolate truffles tucked inside, every bite promises a delightful explosion of chocolate flavor and a luscious texture that’s simply unforgettable. Whether for a cozy night in or to impress your friends with a show-stopping dessert, these cookies deliver pure joy and comfort all at once.
Ingredients You’ll Need
The beauty of this Chocolate Lava Brownie Cookies Recipe lies in its straightforward ingredients, each playing a vital role in crafting that perfect fudgy texture and deep chocolate flavor. From buttery richness to the warm notes of brown sugar and the melty chocolate chips, every component brings something special to the mix.
- Unsalted butter (1/2 cup): Adds luscious richness and helps achieve the fudgy texture.
- Semi-sweet chocolate chips (1 1/2 cups, divided): Brings that bold, melty chocolate taste and delightful pockets of gooeyness.
- Large eggs (2): Provides structure and moisture, helping bind everything beautifully.
- Granulated sugar (1/2 cup): Balances sweetness while contributing to the cookie’s slight crisp edges.
- Brown sugar (1/4 cup): Adds moisture, chewiness, and a hint of caramel-like flavor.
- Vanilla extract (1 teaspoon): Enhances the overall flavor, making the chocolate pop even more.
- All-purpose flour (1/2 cup): The base that holds the cookie together without overpowering the fudgy texture.
- Unsweetened cocoa powder (2 tablespoons): Deepens the chocolate flavor with a rich intensity.
- Baking powder (1/4 teaspoon): Provides just enough rise to keep the cookies tender but not cakey.
- Salt (1/4 teaspoon): Balances the sweetness and accentuates the chocolate.
- Chocolate truffles or chunks (12 pieces): The star guests that melt into a molten, lava-like center inside each cookie.
How to Make Chocolate Lava Brownie Cookies Recipe
Step 1: Prep and Melt the Chocolate
Start by preheating your oven to 350°F (175°C) and lining a baking sheet with parchment paper to prevent sticking. Next, in a microwave-safe bowl, melt the butter and 1 cup of semi-sweet chocolate chips together. Heat in 30-second bursts, stirring every time until you’re left with a silky, smooth chocolate mixture. Let it cool just enough so it’s warm but won’t cook your eggs later on.
Step 2: Whisk the Wet Ingredients
Grab a large bowl and whisk your eggs with both granulated and brown sugars, plus vanilla extract. Whisk this mixture vigorously until it becomes thick and pale, which takes about 2 minutes. This step is crucial because it creates an airy texture that perfectly balances the fudginess of the cookies.
Step 3: Combine Chocolate with Wet Mix
Slowly pour the melted chocolate mixture into your egg mixture, stirring gently as you go. The result is a glossy, decadent batter that smells so divine it’s hard not to dive right in!
Step 4: Mix the Dry Ingredients
In a small bowl, whisk together the flour, cocoa powder, baking powder, and salt. These dry ingredients provide structure without weighing down the cookie’s tender texture.
Step 5: Bring it All Together
Gradually fold the dry ingredients into the wet chocolate batter. Once just combined, fold in the remaining 1/2 cup of chocolate chips for bursts of melty chocolate in every bite.
Step 6: Form the Cookies With the Molten Center
Scoop about 2 tablespoons of dough and flatten it slightly in your hand. Nestle a chocolate truffle or chunk in the middle, then cover it with another tablespoon of dough, shaping it into a ball and sealing the edges carefully. This sealing step ensures that gooey molten center stays trapped inside while baking.
Step 7: Bake to Gooey Perfection
Place the cookies on your prepared baking sheet about 2 inches apart and bake for 10 to 12 minutes. You want the edges to look set but the centers still perfectly soft. Allow them to cool on the sheet for 5 minutes before moving to a wire rack; this helps the centers set just slightly, making for the perfect lava flow.
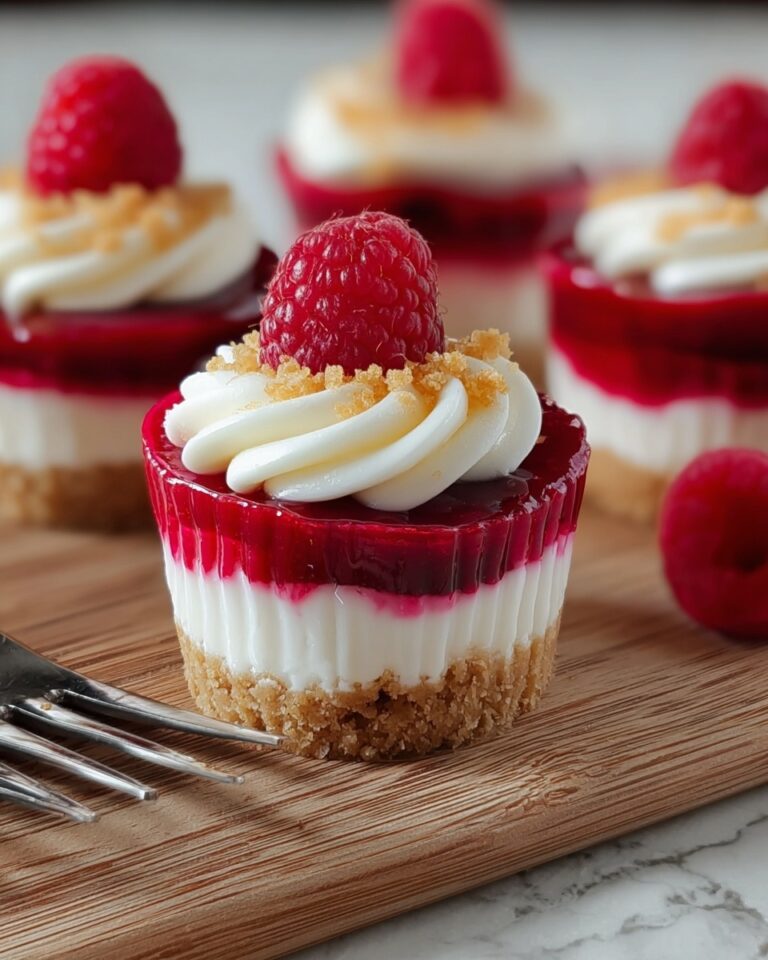
How to Serve Chocolate Lava Brownie Cookies Recipe

Garnishes
These cookies shine all on their own, but a light dusting of powdered sugar or a sprinkle of flaky sea salt can take them to the next level. For an extra touch of indulgence, drizzle with warm caramel or a scoop of vanilla ice cream.
Side Dishes
Pair these chocolate lava brownie cookies with a tall glass of cold milk, a scoop of creamy vanilla ice cream, or a cup of freshly brewed coffee. The contrast between the warm, gooey cookies and a chilled or bitter beverage creates a mouthwatering experience.
Creative Ways to Present
Try serving these cookies warm in a small bowl topped with a fresh berry compote or whipped cream. You could even make a dessert platter with assorted toppings—nuts, fresh fruit, or melted chocolate—to encourage everyone to customize their perfect chocolate lava moment.
Make Ahead and Storage
Storing Leftovers
Leftover cookies keep best in an airtight container at room temperature for up to 3 days. This helps maintain their soft, chewy texture while keeping the molten center ready to ooze upon reheating.
Freezing
You can freeze these cookies either before or after baking. Freeze unbaked cookie dough balls on a tray, then transfer to a sealed container for up to 3 months. For baked cookies, wrap tightly and freeze the same amount of time. Just remember to thaw before reheating for the best texture.
Reheating
Reheat cookies gently in the microwave for about 10 seconds to revive that gooey center and soften the edges. Avoid overheating, or you’ll lose the luscious lava effect that makes this recipe so special.
FAQs
Can I use dark chocolate instead of semi-sweet chocolate?
Absolutely! Using dark chocolate will add a deeper, richer flavor and make these cookies even more decadent. Just be sure to adjust the sweetness to your preference if you go darker.
Is it necessary to use chocolate truffles for the center?
Chocolate truffles make for an indulgent molten center, but you can substitute with chocolate chunks or even caramel candies for a different gooey surprise.
Can I make the dough in advance?
Yes! Chilling the dough for 30 minutes makes it easier to handle and enhances the flavors. You can also prepare it a day ahead and bake fresh when you’re ready.
What if my cookie centers aren’t lava-like after baking?
If your centers aren’t gooey enough, try baking a bit less time next round or ensure you’re using the chocolate truffles or chunks properly sealed within the dough. Underbaking slightly is key to that luscious molten center.
Are these cookies gluten-free?
This recipe uses all-purpose flour, which contains gluten. However, you can try substituting a gluten-free flour blend to accommodate gluten-free diets, but the texture might vary slightly.
Final Thoughts
There’s something truly magical about this Chocolate Lava Brownie Cookies Recipe that makes it a must-try for any chocolate lover. With gooey molten centers and a brownie-like softness, these cookies bring irresistible warmth and comfort to any occasion. So go ahead, treat yourself and your loved ones to this decadent delight—you won’t regret it!
Print
Chocolate Lava Brownie Cookies Recipe
- Prep Time: 20 minutes
- Cook Time: 12 minutes
- Total Time: 32 minutes
- Yield: 12 cookies
- Category: Dessert
- Method: Baking
- Cuisine: American
- Diet: Vegetarian
Description
Indulge in these decadent Chocolate Lava Brownie Cookies that combine the gooey molten center of a lava cake with the rich, fudgy texture of a brownie in a convenient cookie form. Perfectly baked with semi-sweet chocolate chips and a surprise molten core, these cookies are a chocolate lover’s dream come true.
Ingredients
Chocolate Mixture
- 1/2 cup unsalted butter
- 1 1/2 cups semi-sweet chocolate chips (divided)
Wet Ingredients
- 2 large eggs
- 1/2 cup granulated sugar
- 1/4 cup brown sugar
- 1 teaspoon vanilla extract
Dry Ingredients
- 1/2 cup all-purpose flour
- 2 tablespoons unsweetened cocoa powder
- 1/4 teaspoon baking powder
- 1/4 teaspoon salt
Filling
- 12 chocolate truffles or chocolate chunks (for the molten center)
Instructions
- Preheat Oven and Prepare Pan: Preheat your oven to 350°F (175°C) and line a baking sheet with parchment paper to prevent sticking and ensure easy cleanup.
- Melt Butter and Chocolate: In a microwave-safe bowl, combine the butter and 1 cup of semi-sweet chocolate chips. Heat in 30-second intervals, stirring after each until the mixture is smooth and fully melted. Allow it to cool slightly before use.
- Mix Wet Ingredients: In a separate large mixing bowl, whisk together the eggs, granulated sugar, brown sugar, and vanilla extract. Whisk for about 2 minutes until the mixture is thick and pale, indicating proper aeration.
- Combine Chocolate with Wet Mixture: Slowly add the melted chocolate and butter mixture into the wet ingredients, stirring gently to combine without deflating the mixture.
- Prepare Dry Ingredients: In a small bowl, whisk together the all-purpose flour, unsweetened cocoa powder, baking powder, and salt to ensure even distribution of leavening and flavor.
- Incorporate Dry Ingredients: Gradually fold the dry ingredients into the wet chocolate mixture until just combined, being careful not to over-mix to maintain a tender texture.
- Fold in Remaining Chocolate Chips: Add the remaining 1/2 cup semi-sweet chocolate chips and gently fold them into the batter for pockets of melted chocolate in the cookies.
- Form Cookies with Molten Center: Scoop about 2 tablespoons of dough and flatten it slightly in your hand. Place a chocolate truffle or chunk in the center, then cover it with an additional tablespoon of dough. Shape it into a ball, carefully sealing the edges to enclose the molten center completely.
- Arrange on Baking Sheet: Place the cookie balls onto the prepared baking sheet with about 2 inches of space between each to allow for spreading during baking.
- Bake the Cookies: Bake in the preheated oven for 10–12 minutes, watching for the edges to set while keeping the centers soft to achieve the perfect gooey lava texture.
- Cool and Serve: Let the cookies cool on the baking sheet for 5 minutes to allow them to set slightly before transferring them to a wire rack. Serve warm to enjoy the molten chocolate center at its best.
Notes
- For a richer chocolate flavor, substitute with dark chocolate chips.
- If the dough is too sticky to handle, chill it in the refrigerator for 30 minutes before shaping.
- Best served warm to enjoy the gooey molten center, but leftover cookies can be reheated in the microwave for about 10 seconds.


