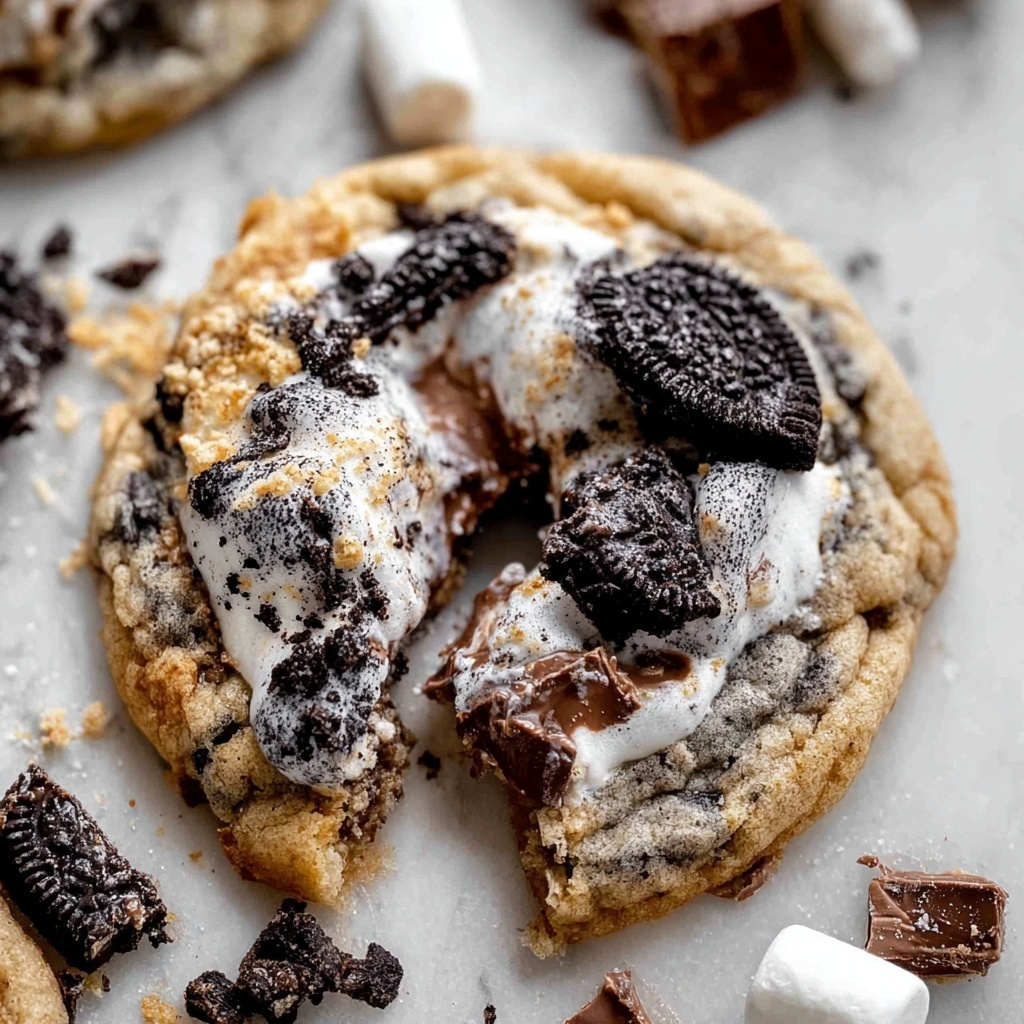
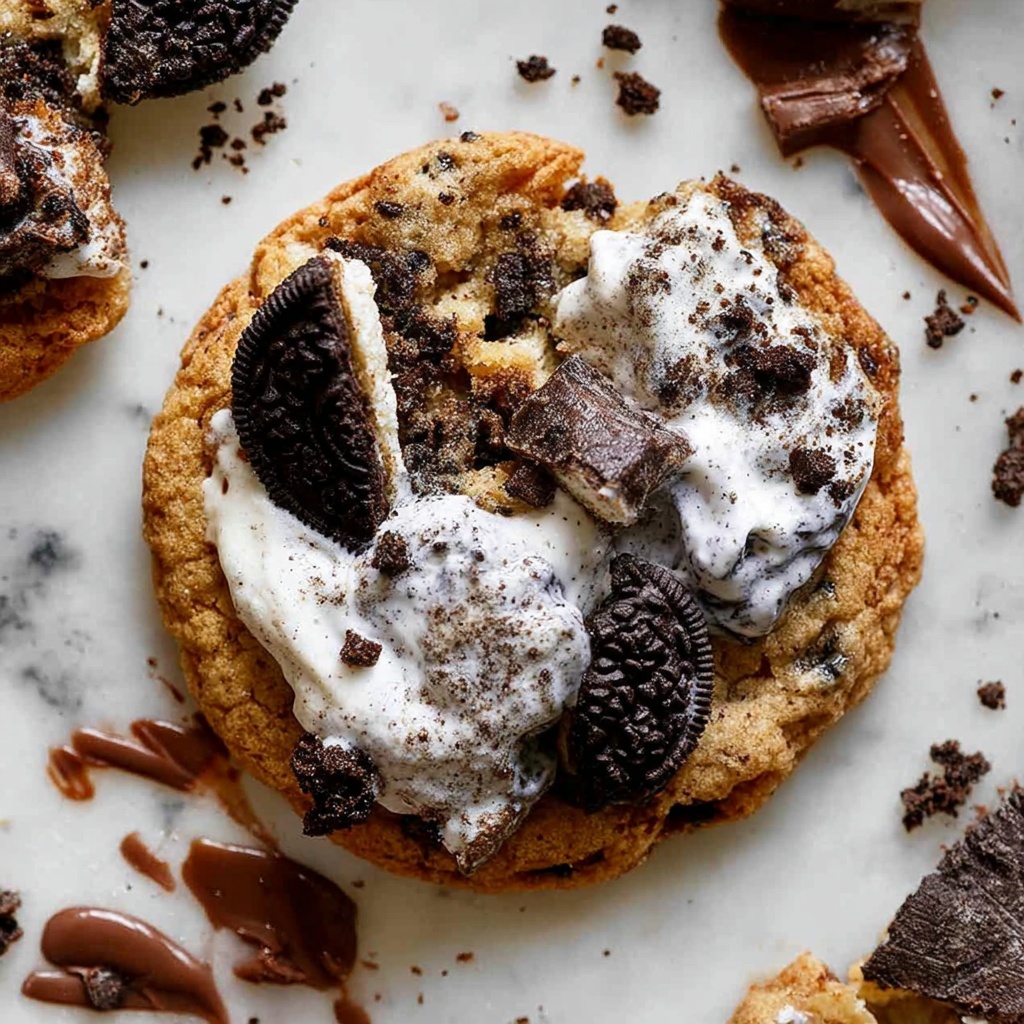
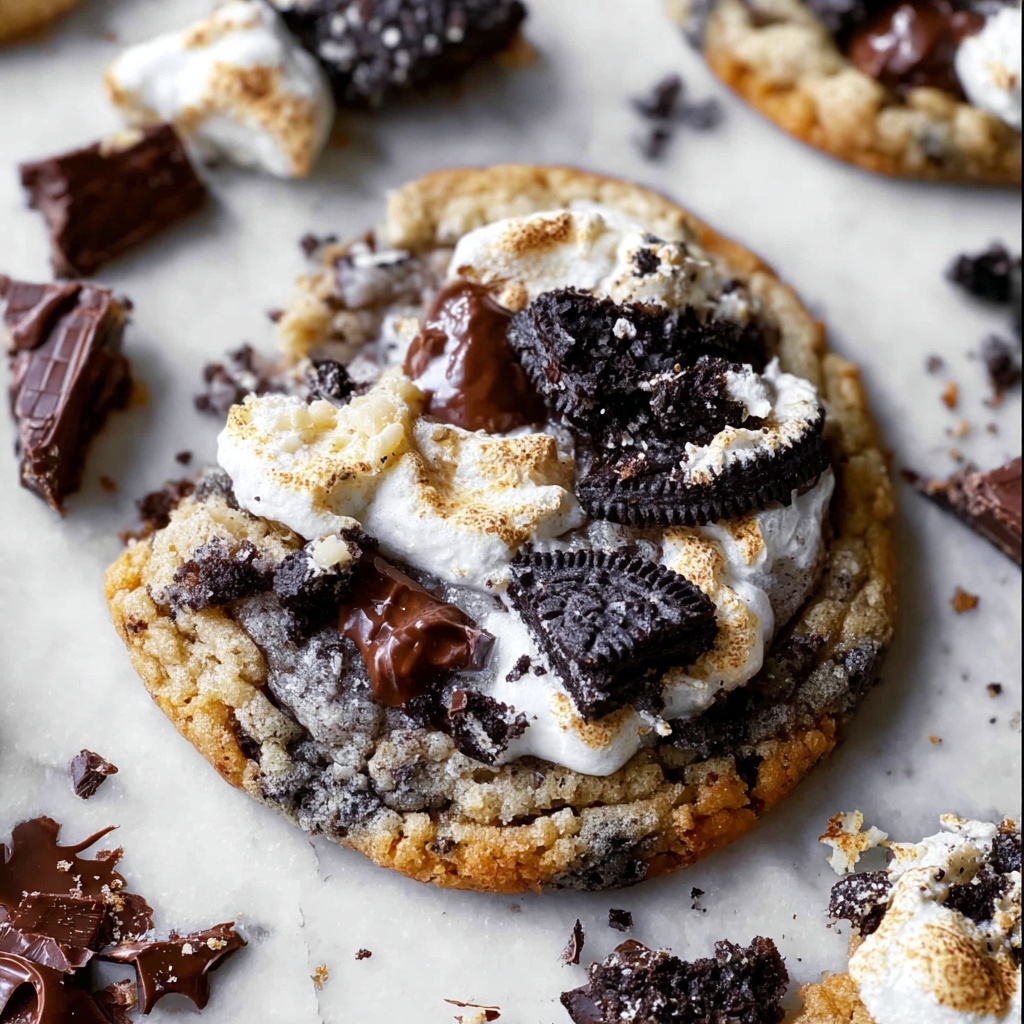
If you have a serious sweet tooth and a love for that perfect blend of crunchy and chewy, you absolutely must try this Chewy Cookies and Cream Cookies Recipe. It’s a delightful mashup of classic cookies and cream flavor with that unbeatable chewy texture, creating cookies that feel impossibly satisfying with every bite. Rich butter, crushed Oreos, gooey candy bars, and melty chocolate chips all come together to create a cookie experience that you’ll want to share with everyone you know. Trust me, once you make these, they’ll become your go-to treat for impressing friends, calming sweet cravings, or simply savoring something downright delicious.
Ingredients You’ll Need
The magic behind this Chewy Cookies and Cream Cookies Recipe is in its straightforward yet thoughtfully chosen ingredients. Each one plays a vital role to get you that moist, chewy texture, balanced sweetness, and iconic cookies and cream flavor we all adore.
- 1 cup butter (softened): Provides richness and creates a tender crumb; make sure it’s at room temperature for easier mixing.
- 1 & 1/2 cups granulated sugar: Adds sweetness and helps with the chewy texture by caramelizing during baking.
- 1 teaspoon vanilla extract: Enhances all the other flavors and adds a warm, aromatic backdrop.
- 2 large eggs: Give the cookies structure but keep them soft and chewy inside.
- 2 & 1/2 cups all-purpose flour: The base that holds everything together; spoon and level it to avoid dense cookies.
- 1 & 1/2 teaspoons baking soda: Helps the cookies spread and rise perfectly—no clumps allowed!
- 1 teaspoon kosher salt: Balances the sweetness and brings out the chocolatey goodness.
- 12 Oreos, pulsed into fine crumbs: Infuses the dough with that signature cookies and cream flavor.
- 12 Oreos, quartered: Create delightful chunks for texture and surprise bites.
- 1 cup dark chocolate chips, chopped: Adds pockets of rich, melted chocolate throughout.
- 4 Hershey’s Cookies and Cream candy bars (divided): Chunky, creamy bits that elevate the cookies to next-level deliciousness.
- Extra mix-ins for garnish (chocolate chips, candy bars, chopped Oreos): For an irresistible finishing touch.
How to Make Chewy Cookies and Cream Cookies Recipe
Step 1: Prepare Your Baking Sheets
Start by lining two large baking sheets with parchment paper or silicone mats. Then preheat your oven to a warm 350 degrees F, setting the stage for cookies that bake evenly and come out perfect every time.
Step 2: Cream the Butter
In a large bowl or stand mixer, beat the softened butter until it’s luxuriously smooth and creamy. Scraping the bowl down occasionally ensures every bit gets incorporated for uniform texture.
Step 3: Mix in Sugar
Add the granulated sugar to the butter and beat them together for about two minutes until the mixture is lighter in color and fluffy. This step is key to achieving that tender, chewy outcome.
Step 4: Add Vanilla and Eggs
Pour in the vanilla extract and crack in your eggs, then beat again until everything comes together smoothly. These ingredients infuse flavor and the proper moisture balance.
Step 5: Combine Dry Ingredients Separately
Instead of mixing your flour straight away, sprinkle your baking soda and kosher salt on top of the flour and stir well. This prevents clumps of baking soda and evenly distributes the salt for a balanced flavor.
Step 6: Mix Flour Into Wet Ingredients
Gradually add the flour mixture to your wet ingredients, mixing just until all streaks disappear. Be careful not to overmix here; gently scraping the bowl’s sides will help keep that tender texture intact.
Step 7: Divide the Dough (Optional but Fun!)
Take half the dough out into another bowl. This division lets you infuse each batch with different Oreo textures and chocolate add-ins for a beautiful marbled effect.
Step 8: Add Fine Oreo Crumbs to One Dough Portion
Pulse 12 Oreos into fine crumbs and mix them thoroughly into one of the dough bowls. This deepens the cookies and cream flavor beautifully throughout the dough.
Step 9: Add Quartered Oreos to the Other Dough Portion
Chop the remaining Oreos into quarters and stir them into the lighter dough. These larger pieces make every bite exciting with that crunch and creaminess.
Step 10: Chop and Distribute Chocolate Chips
Chop your dark chocolate chips into smaller chunks if you like and divide them evenly between the two dough bowls. Small bits of melty chocolate elevate snack time to pure joy.
Step 11: Add Hershey’s Cookies and Cream Chunks
Take two candy bars, chop each into chunks, and fold half into each dough bowl. These add creamier, melt-in-your-mouth bits that make these cookies special.
Step 12 & 13: Mix Add-ins Thoroughly
Carefully fold the chocolate and Oreo pieces into each dough portion separately. Take your time to incorporate but avoid overmixing to maintain texture variety.
Step 14: Combine the Doughs
Gently pour one dough bowl into the other without stirring; this creates the stunning marbled effect when baked, giving you cookies that look as good as they taste.
Step 15: Scoop and Arrange Dough
Using a 2-inch cookie scoop, grab portions of both doughs together to get that marbled swirl in each cookie. Space them about 2 inches apart on your baking sheet since they expand during baking, and arrange them with the light dough facing up for a pretty finish.
Step 16: Top with a Candy Bar Piece
Place one Hershey’s Cookies and Cream candy bar piece gently atop each cookie dough ball. No need to press it in hard—just make sure it sticks so it melts perfectly in the oven.
Step 17: Bake to Golden Perfection
Bake your cookies for 10 to 12 minutes, aiming for lightly golden edges. The tops should still look a little shiny but not wet—pull them out just before they’re fully set for that perfect chewiness.
Step 18: The Secret Edge Fold
Here’s the game-changer: within 60 seconds of removing the cookies from the oven, use two spoons to aggressively push the edges toward the center. This step reshapes the cookies, making them thicker and chewy instead of flat. It may seem odd at first, but it’s pure cookie wizardry.
Step 19: Optional Finishing Touches
If you want, sprinkle extra chocolate chips, chopped white chocolate, or crushed Oreos on top while the cookies are still warm. This adds an inviting look and an extra burst of flavor.
Step 20: Cool and Enjoy
Transfer the cookies to a wire rack to cool completely. That first warm bite with a tall glass of cold milk is downright dreamy—you’re going to savor every crumb.
How to Serve Chewy Cookies and Cream Cookies Recipe
Garnishes
To make these cookies feel even more special, little garnishes can go a long way. A few extra chopped Hershey’s Cookies and Cream pieces, more chocolate chips, or a light dusting of powdered sugar can add visual appeal and textural interest. Plus, these toppings gently enhance the original flavors without overpowering them.
Side Dishes
Pair your chewy cookies with a cold glass of milk, a scoop of vanilla ice cream, or even a warm mug of hot cocoa. The creaminess of the drinks and desserts complements the cookies’ rich texture, making each bite a perfect harmony of warm, sweet comfort.
Creative Ways to Present
Try serving these cookies in a cookie sandwich, layering a dollop of cream or ice cream between two cookies for an irresistible treat. Alternatively, arrange them on a festive platter with mixed nuts and fruit for a party spread. The marbled look will wow your guests before they even take a bite.
Make Ahead and Storage
Storing Leftovers
Store your leftover chewy cookies in an airtight container at room temperature to maintain their soft texture. They should stay fresh for up to a week, making them perfect for baking ahead of time and enjoying all week long.
Freezing
If you want to keep these cookies longer, freezing is your best friend. Freeze the baked cookies individually on a baking sheet, then transfer them to a freezer bag or container. They will keep well for up to three months and thaw quickly at room temperature.
Reheating
To enjoy your cookies warm after storage, pop them in the microwave for about 10 seconds or heat them briefly in a low-heat oven. This revives their soft, chewy texture and melts any chocolate chips—making them taste freshly baked again.
FAQs
Can I use regular chocolate bars instead of Hershey’s Cookies and Cream candy bars?
Absolutely! While Hershey’s Cookies and Cream bars give these cookies their signature flavor, you can swap in other white or milk chocolate bars for a different take. Just keep the texture creamy and sweet to complement the Oreos.
What if I don’t have a food processor to crush the Oreos?
No worries! You can place the Oreos in a sealed plastic bag and crush them with a rolling pin or the bottom of a heavy pan. Just crush until fine crumbs for mixing, and rougher chunks for the other portion.
Why do the cookies need that pressing edge step right after baking?
This technique helps the cookies thicken and retain their chewiness instead of spreading thin and crisping up. It’s a small but essential secret for achieving the perfect chewy texture in this Cookies and Cream Cookies Recipe.
Can I make these cookies gluten-free?
You can try substituting the all-purpose flour with a gluten-free blend of equal measure, but keep in mind the texture might differ slightly. Look for blends designed for baking for best results.
Is it okay to overmix the dough?
Overmixing can develop gluten strands in the dough that make your cookies tough. Mix just until everything is combined and you no longer see flour streaks—this keeps your cookies soft and chewy.
Final Thoughts
This Chewy Cookies and Cream Cookies Recipe is a keeper, loaded with flavors and textures that are endlessly satisfying. Whether you’re baking for a crowd or just indulging yourself, these cookies bring all the comforting nostalgia and rich decadence in every bite. Go ahead and give this recipe a whirl—you might just find your new favorite cookie to make over and over again.