
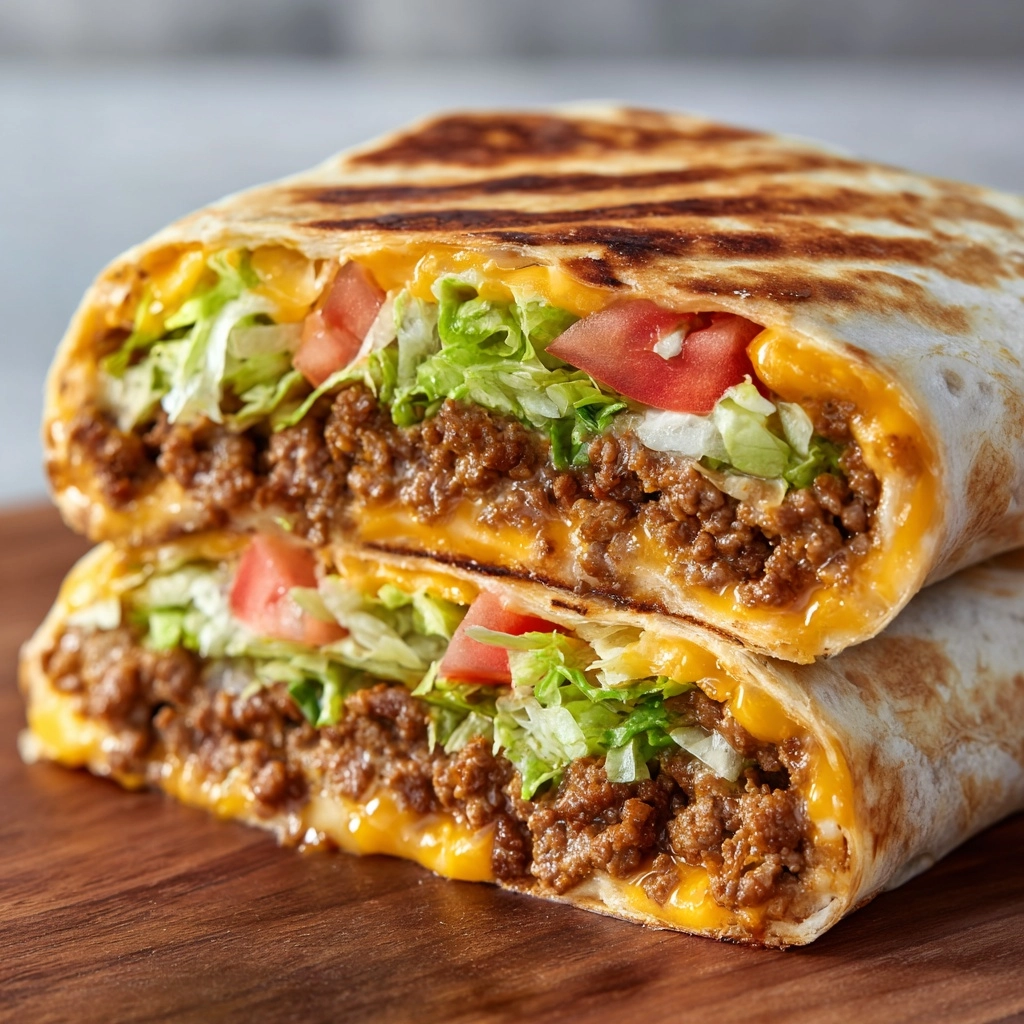
If you think cheeseburgers are fantastic as they are, wait until you try this exciting spin on a family favorite—Grilled Cheeseburger Wraps: A Fun Twist on a Classic Recipe. This dish combines all the beloved flavors of a juicy, perfectly seasoned cheeseburger nestled inside a warm, crispy tortilla wrap, making it an irresistible handheld meal. It’s perfect for weeknight dinners or casual gatherings when you want something hearty but also playful and easy to enjoy. The melty cheddar, tangy pickles, and fresh veggies wrapped with that savory beef create a flavor-packed bite that feels both familiar and amazingly fresh.
Ingredients You’ll Need
To make these wraps truly shine, you only need a handful of straightforward ingredients — each one chosen carefully to build that irresistible balance of flavor, texture, and color you want from a cheeseburger, just in wrap form.
- 1 pound ground beef: The star protein that brings rich juiciness and meaty flavor.
- 1 teaspoon salt: Enhances all the natural flavors of the beef and other ingredients.
- 1/2 teaspoon black pepper: Adds a gentle heat and depth to the seasoning.
- 1/2 teaspoon garlic powder: Provides a subtle aromatic punch that complements the beef perfectly.
- 1 tablespoon Worcestershire sauce: Brings a savory, slightly tangy umami boost to the mixture.
- 4 large flour tortillas: Soft, flexible wraps that hold the fillings together beautifully.
- 1 cup shredded cheddar cheese: Melts deliciously to create that classic cheeseburger gooeyness.
- 1/4 cup ketchup: Adds sweet and tangy notes that brighten every bite.
- 1/4 cup mustard: Delivers a sharp, zesty contrast that balances richness.
- 1/4 cup mayonnaise: Provides creamy smoothness and binds other flavors.
- 1/4 cup chopped pickles: Adds crunch and tartness for that authentic cheeseburger kick.
- 1/4 cup diced onions: Offers punchy sharpness and a fresh bite.
- 1/2 cup shredded lettuce: Gives a crisp, cool contrast to the warm filling.
- 1 diced tomato: Adds juiciness and vibrant color that brighten the wraps.
- Nonstick cooking spray or a little butter: Used for perfect golden crisping on the grill.
How to Make Grilled Cheeseburger Wraps: A Fun Twist on a Classic Recipe
Step 1: Cook and Season the Beef
Begin by heating a large skillet over medium heat and adding your ground beef. As it sizzles, break it apart so it cooks evenly and browns beautifully. Once fully cooked, drain any excess grease to keep the wraps from becoming soggy. Now, sprinkle in the salt, black pepper, garlic powder, and Worcestershire sauce—these simple seasonings deeply elevate the flavor, making the beef juicy, savory, and bursting with character. Give it a good stir, then set aside so the flavors meld while you prepare the other ingredients.
Step 2: Prepare Your Wrap Base
Lay each of the large flour tortillas flat on a clean surface. On each tortilla, spread a thin but even layer of ketchup, mustard, and mayonnaise. This trio is the secret sauce combo that brings all the classic cheeseburger elements together while adding moisture and tang. Be careful not to overdo it—just enough to give a nice flavor base and prevent your wraps from turning too soggy.
Step 3: Layer the Cheeseburger Goodness
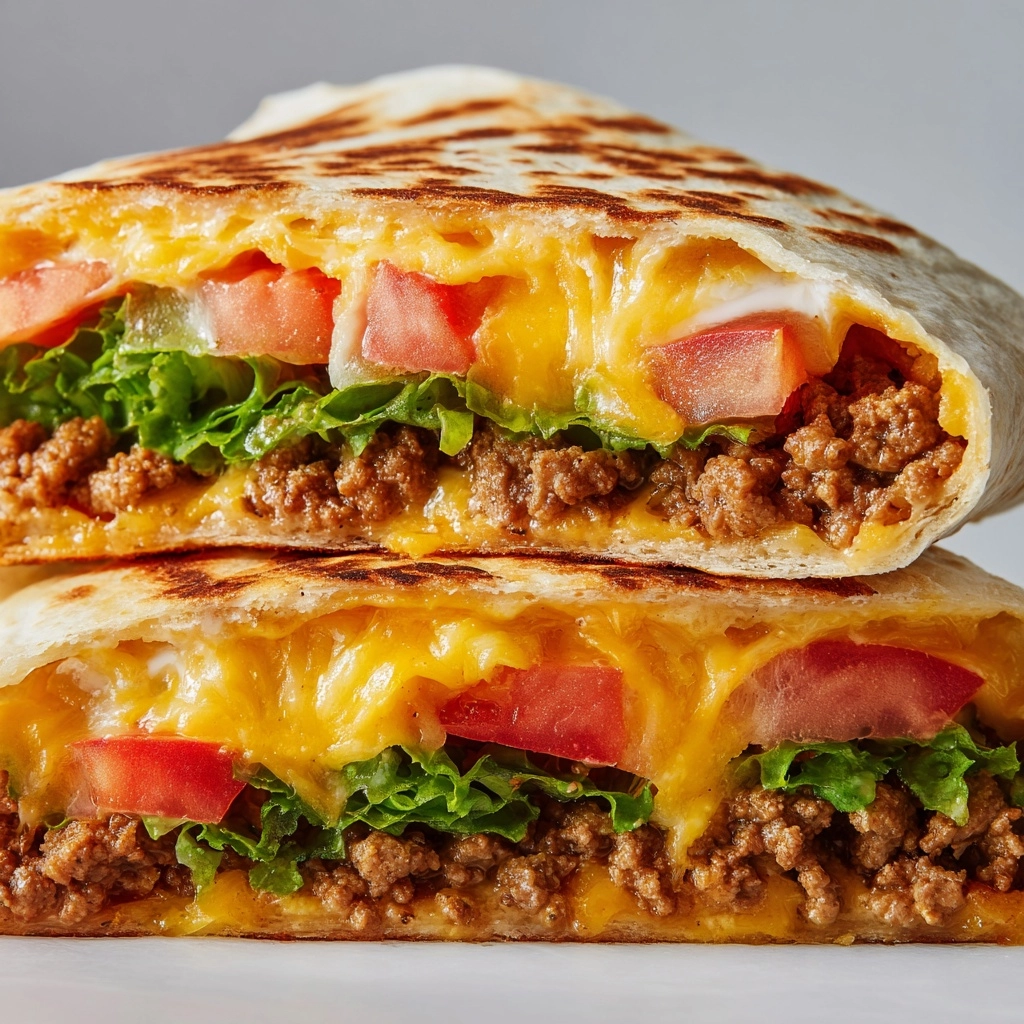
Divide the seasoned beef evenly among the tortillas, spreading it gently over the sauces. Then, sprinkle shredded cheddar cheese generously on top — it’s going to melt wonderfully when you grill the wraps. Scatter the chopped pickles and diced onions over the cheese, adding that essential crunch and layered flavor. Follow it up with shredded lettuce and diced tomato for freshness and vibrant texture.
Step 4: Wrap It Up and Grill to Perfection
Fold in the sides of each tortilla like an envelope, then roll tightly from one end to the other to create a neat wrap that holds all those delicious fillings securely. Heat a skillet or grill pan over medium heat and lightly coat it with nonstick spray or a small pat of butter for that irresistible golden crust. Place the wraps seam-side down first, grilling for 2 to 3 minutes per side until the tortillas are crisp and beautifully browned, with melted cheese perfectly binding everything inside. Once grilled, slice the wraps in half to reveal the melty, colorful layers waiting inside.
How to Serve Grilled Cheeseburger Wraps: A Fun Twist on a Classic Recipe
Garnishes
To elevate your presentation and add fresh bright notes, top your grilled cheeseburger wraps with a sprinkle of chopped fresh parsley or chives. A dollop of extra ketchup or mustard on the side is always welcome for dipping. You can also add a few extra pickle slices or crispy bacon bits on top for contrast and extra flavor depth.
Side Dishes
These wraps pair beautifully with classic sides like crispy French fries or onion rings. For a lighter option, consider a crunchy coleslaw or a simple garden salad dressed with vinaigrette — these sides provide a refreshing balance to the rich and cheesy wraps. Baked sweet potato fries can also make a deliciously sweet and savory complement.
Creative Ways to Present
Serve your grilled cheeseburger wraps on colorful serving plates or wooden boards to highlight their rustic charm. Wrapping each sandwich in parchment paper tied with twine makes them perfect for picnics or casual gatherings. You might also consider cutting them into bite-sized pinwheels for party platters or kid-friendly finger foods, showcasing the colorful layers inside with each bite.
Make Ahead and Storage
Storing Leftovers
If you have leftovers (which is rare but amazing), store the grilled cheeseburger wraps in an airtight container in the refrigerator. They will stay fresh for up to 2 days and retain most of their texture and flavor. Keep in mind the tortillas may soften over time, so reheating properly is key.
Freezing
You can freeze these wraps by individually wrapping them tightly in plastic wrap and then placing them in a freezer-safe bag or container. They’ll keep well for up to 1 month. Freezing is perfect if you want to prep a batch ahead for quick meals later on, but be aware some toppings like lettuce and tomato might not freeze well and are better added fresh after reheating.
Reheating
To enjoy leftover grilled cheeseburger wraps, reheat them in a skillet or grill pan over medium heat, turning occasionally until warmed through and the wrap becomes crispy again. Avoid the microwave if possible, as it can make the tortillas chewy and the cheese greasy. This approach brings back that fresh-grilled texture and melty experience just like the first time.
FAQs
Can I use a different type of cheese?
Absolutely! While cheddar cheese is classic for grilled cheeseburger wraps, feel free to experiment with Monterey Jack, mozzarella, or even pepper jack for a little extra kick. Choose a cheese that melts well to keep that gooey, delicious texture.
Are these wraps suitable for meal prep?
Yes, they are great for meal prepping. You can prepare all the ingredients and assemble the wraps ahead of time, then grill them just before eating to maintain crispiness. Just store the ungrilled wraps in the fridge wrapped in foil or parchment paper.
Can I make these wraps vegetarian?
Definitely! Swap the ground beef with plant-based meat alternatives, cooked lentils, or seasoned mushrooms to keep the savory base. The rest of the ingredients remain the same to maintain that cheeseburger flavor profile.
What’s the best way to keep the tortillas from getting soggy?
Spreading the condiments in a thin layer and thoroughly cooking the beef (draining excess grease) helps prevent sogginess. Grilling the wraps until they’re golden brown also creates a crispy exterior that keeps everything inside perfectly intact.
Can I add other toppings to the wraps?
Yes! These wraps are very versatile. Consider adding cooked bacon, jalapeños for heat, sautéed mushrooms, or even avocado slices. Customize them to your taste and have fun making the recipe your own.
Final Thoughts
There’s something truly delightful about Grilled Cheeseburger Wraps: A Fun Twist on a Classic Recipe that makes dinner feel both familiar and exciting. Easy to make, packed with delicious layers, and perfect for any occasion, these wraps are sure to become a go-to favorite. So grab your skillet, gather the ingredients, and bring the joy of a cheeseburger into a fresh, handheld wrap that everyone will love. You’ll wonder why you didn’t try this fabulous twist sooner!
Print
Grilled Cheeseburger Wraps: A Fun Twist on a Classic Recipe
- Prep Time: 15 minutes
- Cook Time: 15 minutes
- Total Time: 30 minutes
- Yield: 4 wraps
- Category: Main Course
- Method: Stovetop
- Cuisine: American
Description
Grilled Cheeseburger Wraps offer a delicious and fun twist on a classic cheeseburger by wrapping all the savory ingredients in a warm, crispy tortilla. These quick and easy skillet-cooked wraps make a perfect weeknight dinner, combining seasoned ground beef, melty cheddar, and fresh toppings with a flavorful grilled finish.
Ingredients
Beef Mixture
- 1 pound ground beef
- 1 teaspoon salt
- 1/2 teaspoon black pepper
- 1/2 teaspoon garlic powder
- 1 tablespoon Worcestershire sauce
Wraps and Toppings
- 4 large flour tortillas
- 1 cup shredded cheddar cheese
- 1/4 cup ketchup
- 1/4 cup mustard
- 1/4 cup mayonnaise
- 1/4 cup chopped pickles
- 1/4 cup diced onions
- 1/2 cup shredded lettuce
- 1 tomato, diced
For Grilling
- Nonstick cooking spray or a little butter
Instructions
- Cook the Beef: In a large skillet over medium heat, cook the ground beef until browned and fully cooked, breaking it apart as it cooks. Drain any excess grease. Season the beef with salt, black pepper, garlic powder, and Worcestershire sauce. Stir well to combine and set aside.
- Prepare the Tortillas: Lay out the flour tortillas on a flat surface. Spread a thin layer of ketchup, mustard, and mayonnaise evenly over each tortilla to add flavor and moisture.
- Assemble the Wraps: Divide the cooked beef evenly among the tortillas. Top each with shredded cheddar cheese, chopped pickles, diced onions, shredded lettuce, and diced tomato to create the classic cheeseburger elements inside the wrap.
- Fold and Roll: Fold in the sides of each tortilla, then roll them tightly like a burrito to enclose all the fillings securely.
- Grill the Wraps: Heat a large skillet or grill pan over medium heat and lightly coat it with nonstick cooking spray or butter. Place the wraps seam-side down on the skillet and cook for 2–3 minutes per side until the tortillas are golden brown and crispy, and the cheese inside melts.
- Serve: Slice each wrap in half and serve warm for a satisfying and delicious meal.
Notes
- Customize these wraps by adding crispy bacon or spicy jalapeños for extra flavor.
- For a lower-carb version, substitute large flour tortillas with low-carb tortillas or use large lettuce leaves as wraps.
- Ensure the skillet is properly heated to get a nice crispy exterior without burning the tortillas.
- Leftovers can be reheated in a skillet or oven to maintain crispiness.

